Friday, February 22, 2008

CodeCamp.BG Pilot Episode


Last weekend we organized the first Bulgarian code camp - CodeCamp.BG. logoWe were not able to make a mass marketing campaign to popularize it and also setup the site at the last moment. This lead to total number of about 12-13 participants (lectors included) in the event. But exactly this was the key to the great experience we had. The atmosphere was extremely informal and everybody was sharing ideas and knowledge. We were having disputes on variety of different topics from Windows Home Server and virtualization technologies to customer support.

Presentations

We have not prepared a specific schedule for the presentations so we started with a lot. We used some old business cards to write down the names of all presenters and one of the two ladies in the huge audience picked them one by one. Ant the lot fell upon:

First was iCaci who introduce a general lecture about parallel computing. He showed different ways and algorithms to achieve parallelism if we are writing for multi-core platform. At the end of his lecture I was able to plug my notebook and show the new parallel extensions stuff in .NET framework - PLINQ, TPL, etc. as well as the asynchronous workflows in F#.

After iCaci it was Pepi's turn. He demonstrated the lightweight and fancy JavaScript library Mootools. As it turns out it has been used on many places on the web and along with jQuery is one of the fastest JavaScript libraries out there. What was nice was that Pepi have downloaded the whole Mootools site for offline browsing and was able to show all the effects in the library. Very smart.
[Update] Pepi did a new performance testing on the main JavaScript libraries and Dojo is now on top of the hill. Look at the full performance statistics here.

After mooing we jumped to another animal. This time it was a mono (monkey in Spanish). Vlado presented what is it to write applications with Mono project. A lot of great things there. The discussion ended with talk about how he has used Mono.Cecil library to get the job done.

After looking at the visual effects of the Ubunto that Vlado was using we jumped to totally different topic of continuous integration. Ivcho presented the CI Factory. Actually Ivo was the guy who setup it for Bookvar. CI Factory is great if you are starting a new project, but can be a little harmful if you want to migrate an existing one, is that right Ivo? ;)

Finally it was Emo's turn. Emo showed how easy it is to trackback (pingback) enable your site using Argotic Syndication Framework. Actually it was a way more easily that to drive your Hundai Coupe to and from the code camp place ;)

Pictures

Here are some pictures from the event:

Loading...

When is the next edition?

We have plans to make the next CodeCamp.BG somewhere in May, before the start of summer holidays.

Can I participate?

Of course you can. CodeCamp.BG is a free event. You only have to pay for your stay at the place. You can participate as a lector as well. Just send us your presentation ideas.

Final words

Finally I want to give a big thank you to all the guys who were there. I think we had a great time except for the chilly place :)

P.S.: Here are some links of the codecamp's blog coverage: Pepi, Marto, Dido.

Thursday, November 29, 2007

DLR Pad on CodePlex

Finally I have uploaded my DLR Pad application on CodePlex. I have delayed the upload due to two main reasons. First was the new version of Bookvar that we shipped yesterday (unfortunately the final code of the DLR Pad is not yet integrated into Bookvar, but this will happen in the next release). The second reason is that I wanted to refactor some of the code and make provider model for the available languages.

Show me your DLR language

As you just read DLR Pad now has a provider based architecture that will allow any DLR language to be added on the fly. What you need to do is just to write a new DynamicLanguneEngine implementation and override a single property that returns the appropriate ScriptEngine. For example here is the IronPython's implementation:

internal class IronPythonLanguageEngine : DynamicLanguageEngine

{

    public override ScriptEngine ScriptEngine

    {

        get { return PythonEngine.CurrentEngine; }

    }

}

Also you will need edit the config file to add your language implementation:

<add

    name="IronPython" description="IronPython engine."

    languageShortName="ipy"

    type="Avaxo.Scripting.IronPythonLanguageEngine, Avaxo.Scripting" />

For now only IronPython and IronRuby are added by default. However if you want you can register some other language - for example IronScheme (IronLisp) or Smalltalk. In the future when VBX and the new managed JavaScript implementation become available they can also be added to the DLR Pad.

Feel free to download DLR Pad and have fun with it. In my next post I will show you how go wild with it.

I want to say one more thing here.

CodePlex & SvnBridge rocks!

I have been using CodePlex previously for my InfoCardControl. As you may know CodePlex is using TFS to hold the source code. Till recently the most appropriate way to check-in source code was the Team Explorer extension for Visual Studio. Unfortunately I have uninstalled VS 2005 along with the Team Explorer and start to use VS 2008 only. So I have to install Team Explorer this time for VS 2008. And oh man its file size is 387 MB. So while downloading I decided to try the SvnBridge developed by the guys from CodePlex. And magically it worked. The tool is only 427 KB and basically sits between your local svn versioned files and remote TFS. Every svn operation you execute gets it mimic into TFS one. Combined with TortoiseSVN and you are ready to go to space :) I encourage anyone to try SVN Update DLR Pad for himself to see the SvnBridge in action.

That's it for now. Stay tuned as I will show you how to do crazy stuff with DLR Pad.

P.S.: Any comment about the code is welcome and encouraged.

kick it on DotNetKicks.com

Sunday, November 18, 2007

DLR Pad - interactive programming with XAML and DLR

This post is about a tool that I have build. It is called DLR Pad. In one sentence it allows you to rapidly create simple XAML based applications and script against them with dynamic language of your choice. DLR Pad was in my head for quite some time, but recently I had enough time to implement it. Let me explain how I came up with the idea.

Idea

As you maybe already know this summer I have been to Korea to participate in this year's Imagine Cup competition. Our team have build a mind mapping application - Bookvar. We believe that Bookvar is the next generation mind mapping tool. I encourage you to go there, download the application and send us your feedback; we are listening. In order to win the competition we tried to use all the latest Microsoft technologies. Unfortunately we did not qualify for the final round. Now a couple of months later we are highly motivated to make Bookvar a real product.

DLR - Dynamic Language Runtime

One of the technologies we have used in Bookvar is DLR - Dynamic Language Runtime. DLR is a set of classes and services that allow building of high performance dynamic languages on top of CLR. The beauty of DLR is both the common type system that is shared between all language implementations and in the .NET integration itself as well. This means that you can access the whole .NET Framework. Right now Microsoft is in process of implementing two languages on top of it - Python and Ruby, called IronPython and IronRuby. Both of them are pure open source projects and can be downloaded from here - IronPython, IronRuby. If you want to wake up your inner sleeping language geek I encourage you to check them out (IronRuby even accepts external contributions).

We have used DLR to create an interactive programming environment (Bookvar console) for interacting with our mind mapping model. You can check demo of it in this Channel 8 video. The code for the console is based on the DLRConsole sample here.

After the competition I wanted to extend the Bookvar console so that I can define XAML objects (similar to XAMLPad) and write code against them in one of DLR languages. This is how DLR Pad was born.

DLR Pad

Let's look at the main window of the app:

DlrPadMain

At the top left you can see the interactive console. It will be our coding sandbox. On the right is the rendered XAML content. The XAML itself is defined in big text box in the bottom. In our case we have a simple button called 'button'. What is cool about it is that we can access the button in the console window using its name. For example we can change the button's text using this snippet of code:

button.Content = "Hello"

Actually we are using IronPython here. Note that when you type the '.' you will get an IntelliSense window that will list all available members on the Button type. Unfortunately the IntelliSense works only in IronPython. IronRuby is still in pre-alpha release so only part of the features are implemented right now.

DlrPadIntelliSense

Adding event handler to the button

Let's examine more complex scenario - adding click event handler to the button.

IronPython way
Here is the python code to do this:

def handle(*args) : button.Content = "IronPython"
button.Click += handle

DlrPadIPHandle

IronRuby way
Here is the ruby equivalent to the same operation:

button.click { button.Content = "IronRuby" }

DlrPadIRHandle

Note: In order to start coding in IronRuby you should pick it up from the combo in the upper left corner.

Each object that you defined in your XAML that has a Name (x:Name) automatically is available in the console window.

What's next?

I'm in the process of setup the code on CodePlex here. The console has some bugs that I'm aware of. I also have some ideas how to expand the application in the future - ability to load and use custom assemblies and other interesting stuff. Your feedback and suggestions are welcome as well.

Download

Start experimenting and having fun with DLR Pad by downloading it from here.

Hope you will find the tool useful.

Saturday, November 3, 2007

CanYou? - sample Facebook application

[Update: The source can now be found here. It has been updated to use the latest version of FacebookNET library.]

As you can read from my previous post I have been invited to give a presentation about ASP.NET at Computer Space event. I have picked up the idea about building a Facebook application with ASP.NET. And here it is. It is called "Can You?". Let me explain you the idea behind it.

The Idea

The idea of the app is to utilize your social graph and search through all your friends in order to check can you do particular activity. For example you may want to stay for a couple of nights in France and want to see if some of your friends can help you. The idea is simple and silly, but can be expanded to have more potential if your friends also add the application. Then searching for appropriate connections can be expanded on their friends too. (Note that Facebook did not allow you to recursively get friends of your friends. Only one level down from the currently logged user). You can install the app to your Facebook account from here.

Development of the Idea

I have previously mentioned that there are 2 libraries for building Facebook applications with .NET - Facebook.NET and Facebook Developer Toolkit. The first one is build by no other but Nikhil Kothari, the second by Clarity Consulting. So which to use? Without a doubt the Facebook.NET is the way to go. It has some pretty good server controls that abstract away some of the Facebook plumbing. I'm not going to explain in details Facebook.NET, nor the ways you can build apps for Facebook. You can learn all this in Nikhil's introduction to Facebook.NET post. I encourage you to read it right away. Next time it is best to come to my presentation :)

Now I will focus on the application and how I utilize the library.

Activity Provider

As you have already learned about the idea and probably played with the app let me explain you the implementation details. The application is build on the idea of Activity Providers. Each activity provider holds details about specific activity that the user will be able to do - for example going to foreign country or working at some company. The Activity Provider is based on the provider model introduced in .NET 2.0 and all available activities are picked from the configuration file. Each activity provider must implement:

public abstract ActivityControl GetActivityControl(Page page);

which returns an instance of ActivityControl.

ActivityControl

ActivityControl is very simple. It derives from user control and have a simple event called ActivitySelected defined this way:

public event EventHandler<ActivitySelectedEventArgs> ActivitySelected

ActivitySelectedEventArgs

The event arguments for the ActivitySelected event is simple class that holds the ids of the users which are appropriate (match the condition) for the selected activity.

public class ActivitySelectedEventArgs : EventArgs

{

private readonly List<string> appropriateUids;

public IList<string> AppropriateUids

{

get { return appropriateUids; }

}

public ActivitySelectedEventArgs(IEnumerable<string> appropriateUids)

{

this.appropriateUids = new List<string>(appropriateUids);

}

}

These arguments are then used on the default.aspx page to display the list of friends that can do the work. Let's look at the Default.aspx page.

Default page

In the default page we have a drop down with all available activities. We populate it using a helper class that retrieves them from the configuration file. When an activity is selected we load its ActivityControl in a PlaceHolder. Then when the ActivitySelected event is rose we have a ListView (new class in 3.5 that provides complete control over on the generated markup, something like repeater on steroids; more details for it on ScottGu's blog) that we bind with the appropriate friends. That's it. I would not paste any code or markup. You can look at them in the sample solution.

Now let's examine the two activities that I have created.

Country Activity

This is activity for visiting a foreign country. Let's look at the code and let me explain you what it does:

List<string> appropriateUids = new List<string>();

string selectedCountry = ddlCountries.SelectedValue;

FacebookApplication fbApp = FacebookApplication.GetCurrent(Page);

object queryResults = fbApp.Service.Fql.ExecuteQuery(

string.Format(

@" SELECT uid, hometown_location.country

FROM user

WHERE uid in (

SELECT uid2

FROM friend

WHERE uid1={0}

)",

fbApp.UserID));

foreach (object result in (IEnumerable)queryResults)

{

string country = DataBinder.Eval(result, "hometown_location.country").ToString();

if ( country.Equals( selectedCountry, StringComparison.OrdinalIgnoreCase ) )

{

appropriateUids.Add(DataBinder.Eval(result, "uid").ToString());

}

}

OnActivitySelected(new ActivitySelectedEventArgs(appropriateUids));

First we get the current FacebookApplication object (same technique is used for getting ScriptManager for example). The FacebookApplication is headstone for accessing the Facebook API. Using it we are able to execute FQL (Facebook's SQL like DSL for making queries and return particular projections of the data. This ends up in less traffic and backend parsing) which gets the id and country of all friends of the currently logged user. Then we iterate over the results and check for appropriate data. Have a closer look how we access the results. What Facebook API returns from a FQL query is just a collection of property bags (JSON objects). To handle them Facebook.NET implementation creates an instances of its own internal object:

internal sealed class JsonObject : Hashtable, ICustomTypeDescriptor

As you can see it implements ICustomTypeDescriptor, which provides runtime information about object's properties, methods, etc. This is way we are using the DataBinder.Eval() method to get the required data. In our case this is the country(Note that we can specify the country in a where clause in the FQL).

Work Activity

This one check's whether some of your friends is working in particular company so they can help you work there too.

LINQ sourceI'm posting a screenshot here, because my code highlighting tools breaks on LINQ queries :) As you can see from it here we are using LINQ this time to find did anyone of our friends have ever worked at the selected company. This query will pull the all fields data about the friends. This can be optimized using the second parameter passed to GetUsers() method. It specifies which particular fields you want to be retrieved.

So that's it. You can look at the sample and try to build your own activity that can be plugged into the application.

Download materials

Here is the link to the source code. It has a little bug I'm sure you will find it :) Note that I'm including the source to Facebook.NET, because I have found a small bug in the code and have to fix it.

Presentation is available here. It is in the form of mind map. You have to download and install Bookvar in order to open it.

You can also look at the presentation in our Silverlight based mind map viewer here.

P.S.: Unfortunately I had some problems with the hosting facilities and the application that is uploaded to the server is build on ASP.NET 2.0 and did not have the AJAX stuff I have originally added to the application.

P.S.S.: You can also listen to this .NET Rocks! podcast with Nikhil Kothari talking about Facebook.NET, Script#, life, etc.

Wednesday, October 24, 2007

Computer Space 2007

I will be giving a talk at this year's Computer Space event - at 28th of October. The event will be held in Czech Centre Sofia and my presentation is scheduled to start at 14:45. You can also check the whole event schedule here (BG version). I will going to talk about how to build Facebook applications with ASP.NET. The presentation is not ready yet, but the concept of the app that I will build is. It will be called "Can You?". Stay tuned for more information about the event and the app. The slides (if any :) and the source code will be available right after the presentation.

See you there.

P.S.: Vladi Tchalkov will give a presentation about building Silverlight apps right before mine. So be there earlier for Silverlight goodness.

Sunday, October 21, 2007

Building 3D Cube in Silverlight 1.0 using Script#

Silverlight 1.0 is out there in the wild for a couple of months righorse riverht now (otherwise to say this is to use the classic Bulgarian folklore - "Уйде коня в ряката", translated into English - "Went the horse into the river"). Silverlight 1.1 is still in alpha (beta was scheduled for "later this year") and it is not a good idea to go in production with 1.1. So if you want to use Silverlight on your site today, you must constrain yourself to 1.0 and pure JavaScript. This is not true if you are aware what tools are out there for software developers.

Script# - building Silverlight 1.0 applications with C# today

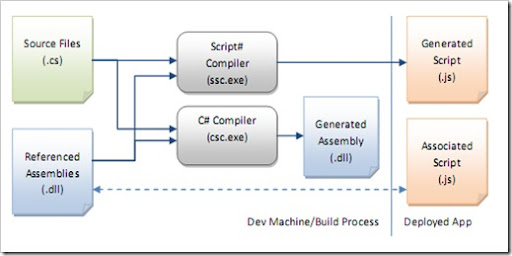
Script# is a "C# compiler that generates JavaScript as its output instead of IL". Yes that's right. You write your code in plain old C# and in the end you have clean and optimized JavaScript code, ready for deployment. The genius behind Script# is Nikhil Kothari, who developed it on his spare time. (it seems that if you work for Microsoft you have a lot of spare time :) As you can see from the diagram below Script# parses the C# files and produce JavaScript. Also the C# compiler is run against the code to verify its correctness.

script#

Leaning Script#

Understanding Script# programming metaphor is not hard, but have some learning curve. Must read is the read me file, which can be found here. The readning is not a couple of pages, but full blown document, which is very well structured (thanks Nikhil :). If you are familiar with both C# and JavaScript the learning process will be painless and you should only familiarize yourself with some of the new concepts that Script# introduces - scriptlets for example. A good way to explorer Script# is to use ultimate number one .NET developer tool - Reflector.

Building the Cube

As stated in the beginning Silverlight 1.0 is the choice if you want to rich enable your site. However there are a lot samples out there that target 1.1. One of these is the 3D Rotating Picture Cube in Iron Python. If you follow the forum thread you will see that the sample gets translated into C# again for 1.1. Actually the source for the sample came from this wonderful flash tutorial, which gives deep explanation about how to apply matrix transforms on objects and in the end has the source for the cube in flash.

Algorithm for the cube

I'm not going to explain the algorithm for displaying the cube. I just copy and paste it from the samples and renamed some of the methods and fields to be more meaningful. I must confess that I have problems with my geometry classes (I wish it was only geometry) this year in university, but finally managed to take them. Enough side talks, lets look at some code.

Code behind the cubeCubeSolution

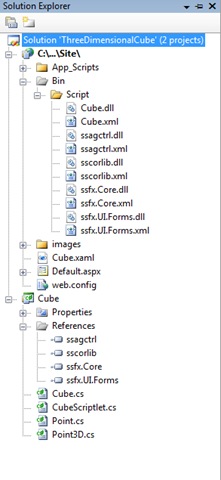
Again I will leave the matrix transformation stuff for geometry geeks and will concentrate how to use Script# to get things done. First of all you must download Script# from its download page. After installation a couple of new projects will be available in the newly created Script# project group. Note: Script# have 2 modes - one is to output JavaScript code based on Script# core library, other is to output code that targets ASP.NET AJAX framework. First option is better for now, because Script# have more powerful library (in out case we will heavily use the Math object). Ok let's create a project of type "Class library in a web site". In order to use Silverlight object model we should also add a reference to the ssagctrl.dll that comes with the installation. All these starting procedures are well explained in the read me file. All the interesting stuff is in the Cube.cs and CubeScriptlet.cs files.

Cube.cs

Cube class is the main class that do all the logic. Let's look at its constructor:

public Cube(SilverlightControl control, string[] imageUrls, double edgeLength)

{

rotation = new Point3D(0, 0, 0);

this.edgeLength = edgeLength;

this.control = control;

root = (Canvas) control.Content.FindName( "Root" );

root.Width = edgeLength;

root.Height = edgeLength;

InitializeImages( imageUrls );

InitializeEdgePoints();

Rotate( 0, 0 );

}

It takes:

  • SilverlightControl for doing the hooks with the Silverlight plug-in. Note that this Silverlight control has the same API that has the original browser plug-in for Silverlight. Actually for producing it another feature of Script# was used - ability to import 3rd party components and controls as Script# libraries.
  • array of strings that holds the URLs to the images that will be used as faces of the cube
  • edgeLength that show how big should be the cube.

A reference to the Root canvas is obtained using the Silverlight control . This canvas should be present in the XAML file that is used for the initialization of the SilverlightControl (we will look at this in the scriptlet file). Then some initialization operations are performed and finally default rotation is used to put the cube in its default position. Let's look how we initialize the images:

private void InitializeImages( string[] imageUrls )

{

foreach ( string imageUrl in imageUrls )

{

Image image = (Image) control.Content.CreateFromXaml(

string.Format(@"

<Image Width=""{0}"" Height=""{0}"" Source=""{1}"" Visibility=""Collapsed"">

<Image.RenderTransform>

<MatrixTransform Matrix=""1,0,0,1,0,0"" />

</Image.RenderTransform>

</Image>", edgeLength, imageUrl), true);

root.Children.Add( image );

Canvas.SetLeft( image, 0 );

Canvas.SetTop( image, 0 );

}

}

For each url a new instance of type Image is created using the helper method CreateFromXaml(), exposed by the SilverlightControl. Note that this is the only way to create Silverlight 1.0 objects, because they did not have public constructors. When each image is created, it is added to the root canvas and positioned at (0,0). As you can see in the beginning each image won't be visible, because it has its visibility set to collapsed. This is why we call the Rotate() method in the constructor. It is going to apply the correct visibility according to the current position of the cube. Let's look at the Rotate() method itself:

public void Rotate( double offsetX, double offsetY )

{

rotation.X -= offsetY;

rotation.Y += offsetX;

Point[] transformations = CalculateTransformationPoints();

ApplyTransformation( 0, transformations[ 2 ], transformations[ 0 ], transformations[ 3 ] );

ApplyTransformation( 1, transformations[ 5 ], transformations[ 1 ], transformations[ 2 ] );

ApplyTransformation( 2, transformations[ 0 ], transformations[ 2 ], transformations[ 1 ] );

ApplyTransformation( 3, transformations[ 4 ], transformations[ 3 ], transformations[ 0 ] );

ApplyTransformation( 4, transformations[ 3 ], transformations[ 4 ], transformations[ 5 ] );

ApplyTransformation( 5, transformations[ 1 ], transformations[ 5 ], transformations[ 4 ] );

}

Again this is mainly geometry stuff. What is interesting here is the how the offsets are applied to the rotation member. If you have looked closely into the constructor's body you have found that rotation member is of type Point3D - custom class in the solution, which holds the current position of the cube. Finally let's look at the ApplyTransformation() method:

private void ApplyTransformation( int faceIndex, Point a, Point b, Point c )

{

UIElement element = root.Children.GetItem( faceIndex );

element.Visibility = IsFaceVisible(a, b, c) ? Visibility.Visible : Visibility.Collapsed;

if (element.Visibility == Visibility.Visible)

{

MatrixTransform transform = (MatrixTransform) element.RenderTransform;

Matrix matrix = transform.Matrix;

matrix.OffsetX = a.X;

matrix.OffsetY = a.Y;

matrix.M11 = ( b.X - a.X ) / element.Width;

matrix.M12 = ( b.Y - a.Y ) / element.Width;

matrix.M21 = ( c.X - b.X ) / element.Height;

matrix.M22 = ( c.Y - b.Y ) / element.Height;

transform.Matrix = matrix;

}

}

It handles the complex logic for applying the right matrix transform to the item. In case the face should be hidden its visibility is collapsed and the item is not processed.

CubeScriptlet.cs

This file contains the logic for hooking the DOM elements into our newly created Cube class. Let's examine its constructor:

private CubeScriptlet(Dictionary arguments)

{

Application.Current.RegisterDisposableObject( this );

button = new Button( (DOMElement) arguments[ "Button" ] );

button.Click += OnButtonClick;

ControlParameters cubeParameters =

new ControlParameters( (string) arguments[ "MarkupURL" ], (DOMElement) arguments[ "ParentElement" ],

(string) arguments[ "ID" ], (string) arguments[ "CssClass" ] );

cubeParameters.background = "black";

ControlFactory.CreateSilverlight( cubeParameters, OnXamlLoaded, null, arguments );

}

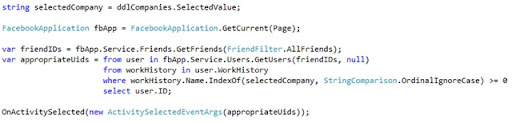
Here you can see the way to create Silverlight plug-in object. It is through the ControlFactory class, which gets a bunch of parameters for initialization. One of them is the url for the XAML markup that we use to find the root canvas in. What is interesting here is the code for initializing our cube class. This code is in a method called OnXamlLoaded(). It is a callback which gets called when the XAML contents are parsed and constructed in memory. Here is the method:

private void OnXamlLoaded(SilverlightControl control, object context)

{

string[] imageUrls = (string[]) Script.Eval( (string)( (Dictionary) context )[ "ImageUrls" ] );

double edgeLength = (double) ( (Dictionary) context )[ "EdgeLength" ];

cube = new Cube( control, imageUrls, edgeLength);

}

You can see that the URLs to the images are passed as one string. As we will see in a minute this string is JavaScript array of strings serialized as JSON. This is why we need to eval it here before passing it to the Cube constructor.

Other interesting part is the handler to a button's click event, which starts and stops the rotating of the cube:

void OnButtonClick(object sender, EventArgs e)

{

if ( intervalToken != 0 )

{

( (InputElement) button.DOMElement ).Value = "Start";

Window.ClearInterval( intervalToken);

intervalToken = 0;

}

else

{

( (InputElement) button.DOMElement ).Value = "Stop";

intervalToken = Window.SetInterval(OnTimer, 50);

}

}

private void OnTimer()

{

cube.Rotate(0.1, 0.1);

}

Note that Script# has a animation framework, which can be used here as well.

Default.aspx

Finally let's look at the chunk of code that we need in our page.

<ssfx:Scriptlet runat="server" ID="scriptlet" PrecompiledScriptlet="Cube.CubeScriptlet"

EnableDebugging="True">

<References>

<ssfx:AssemblyReference Name="sscorlib"></ssfx:AssemblyReference>

<ssfx:AssemblyReference Name="ssfx.Core"></ssfx:AssemblyReference>

<ssfx:AssemblyReference Name="ssfx.UI.Forms"></ssfx:AssemblyReference>

<ssfx:AssemblyReference Name="ssfx.XDAjax"></ssfx:AssemblyReference>

<ssfx:AssemblyReference Name="ssagctrl"></ssfx:AssemblyReference>

<ssfx:AssemblyReference Name="Cube"></ssfx:AssemblyReference>

</References>

<Arguments>

<ssfx:ElementReference ElementID="btnTest" Name="Button"></ssfx:ElementReference>

<ssfx:ElementReference ElementID="cubeContainer" Name="ParentElement"></ssfx:ElementReference>

<ssfx:StringLiteral Value="cubeControl" Name="ID"></ssfx:StringLiteral>

<ssfx:StringLiteral Value="Cube.xaml" Name="MarkupURL"></ssfx:StringLiteral>

<ssfx:StringLiteral Value="root" Name="CssClass"></ssfx:StringLiteral>

<ssfx:StringLiteral Value="[&quot;images/sqeagle.jpg&quot;,&quot;images/sqgorilla.jpg&quot;]" Name="ImageUrls" />

<ssfx:NumericLiteral Value="330" Name="EdgeLength"></ssfx:NumericLiteral>

</Arguments>

</ssfx:Scriptlet>

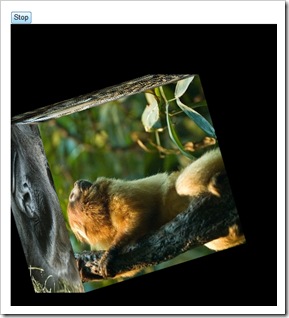
We are using the Script# server control called Scriptlet that allow us to easily embed our code into the page. You can see here how we pass the array with image URLs as JSON string (for the sake of the sample I have removed the other four pictures from the array, because the string gets big).

So that's it. You can see a action shot bellow and find the download link at the end of the post.

action

Gotchas found during development

  • Cannot create Silverlight objects from code. You can only use the factory method of the Silverlight control, which creates objects from XAML and returns DependencyObject that you should cast to your type. In case you want to create objects that did not derive from DependecyObject it gets complicated. This is way I ended with my own Point class and did not use the Point class from the framework.
  • Using the Scriptlet server control is uncomfortable when your scriptlet is in another assembly. In order to refresh it when you rebuild it, it is required to switch to design mode to remove the reference to your assembly and add it again in the assembly references list of the control.
  • The scriptlet approach is good when you can use the server side control, but when you want to embed just the script there is some extra work.

Hope you will enjoy the sample and start your Silverlight apps today with Script#.

Download the sample solution from here.

P.S.: More translated traditional Bulgarian jokes can be found here.

P.S.S.: For more Silverlight samples with Script # - check Nikhil's carousel series.

Friday, October 19, 2007

Working with TFS offline / disconnected

If you have worked with TFS (stands for Team Foundation Server, not for Tradition Financial Services or Toronto French School) when the server is unavailable (if your server is down or your VPN connection has gone away) you have definitely experienced one thing:

Working with disconnected TFS sucks!

Yep. This is truth and the truth hurts. I have even recently heard developer saying "Fucking TFS. SourceSafe was better. It just worked". I did not want to comment on TFS vs SourceSafe - both hands up for TFS and its atomic change sets. I also did not want to comment on TFS vs Subversion, where Subversion just stand out in disconnected environment. MS are promising that this "mistake" will be fixed in the next version of TFS. But while we are waiting for it I will tell you (you maybe already aware of it already) how to make it less painful.

Team Foundation Power Toys (Tools) - TFS painkiller

Don't hesitate and go straight to the download link. TFPT consist of a bunch of useful tools and additions to TFS. Most interesting is the command line utility - TFPT.exe, which have a bunch of options. What we need is the option online of the tool. Here is sample how to use it:

tfpt.exe online /recursive /delete path_to_folder_with_solution

We need the recursive switch to recursively walk through the directories and search for changes. Delete is required if you have deleted items from the solution. This command will bring a popup windows that will display all actions that you will do. If you did not the window to show you can use the /noprompt switch. If you are uncertain what will happen you can use the preview switch:

tfpt.exe online /preview /noprompt path_to_folder_with_solution

This will show all the modifications that will be done, without actually doing them. Note that if you have renamed files the tool did not catch it. So it may sounds silly but don't rename while disconnected.

You can read more about the tool here and here or in the document that comes with the installation.

Hope this will help you leave the swearing from TFS to some other place. I can think about two or three of those places. What about you?